Monday, November 21, 2016

1/35 Tiger I Late (AFV Club) Tiger 211 SS.Pz. Abt 102

I finally got the tools and clasps done for my Tiger. I used a set of Griffon Model Clasps. These are not the traditional 3 part type but rather a 2 part type with the base and clasp forming one part and the locking arm another. I think they are easier to work with then the 3 part type but still a tough go.

One area that was another challenge was the shovel. Here I had to scratch build the mount for it as the kit part just basically has it lying flat on the hull. The actual shovel mount had legs on the part that holds the head of shovel in place and a raised pedestal approximately half way down the shovel that held the clamp. I used some bits of Photo etch I had from another Tiger PE set to reproduce this feature.

During my clean up of the sledge hammer to remove the molded on clamps I managed to snap it in two. Undaunted, I grabbed some 1.2 mm plastic rod and sanded it down on two sides to give it a flatter appearance. Next, I drilled out a hole in the head of the sledge then carved out the area in the shape I needed for the shaft and fixed the new handle to the head. A quick and fairly simple fix. For the bolt cutters there was no way I was going to be able to remove the molded on clamps without destroying the part so I snipped off the end where the locking arm goes, cleaned it up and added said locking arm to the part. The kit part does not give you the the retaining loop that the bolt cutters slide into so I made this with some lead foil.

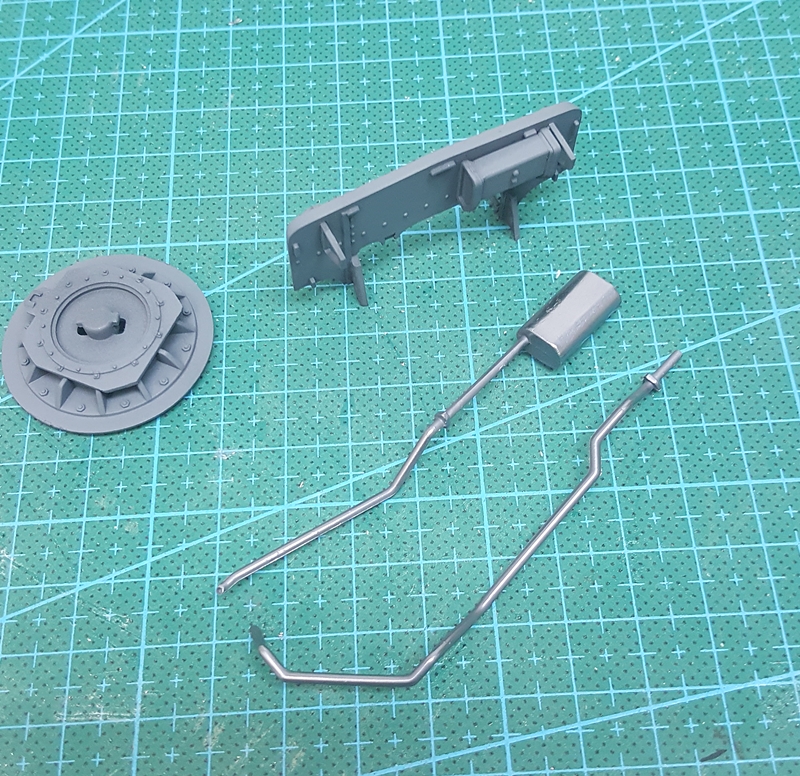
For the cleaning rods and tow cable mounts and the tow cables themselves, the kit gives you the all in one version which is pretty much standard with most kits. I didn't like these as the detail was soft especially on the tow cables. In looking through the sprues I found that AFV Club gives you the individual mounts/brackets for the tow cables and cleaning rods. This was a nice surprise as I was planning on scratching my own. Definitely a time saver. You can see them in the pics below. Also, I discovered that I had a set of Eureka XXL Tiger I tow cables which I had purchased and forgot about a few years back. Because I had forgot about them I purchased a  Griffon set which also comes with the brass cleaning rods. So, no need to scratch the cleaning rods, another time saver. Of course both sets have the track changing cables as well which is nice.

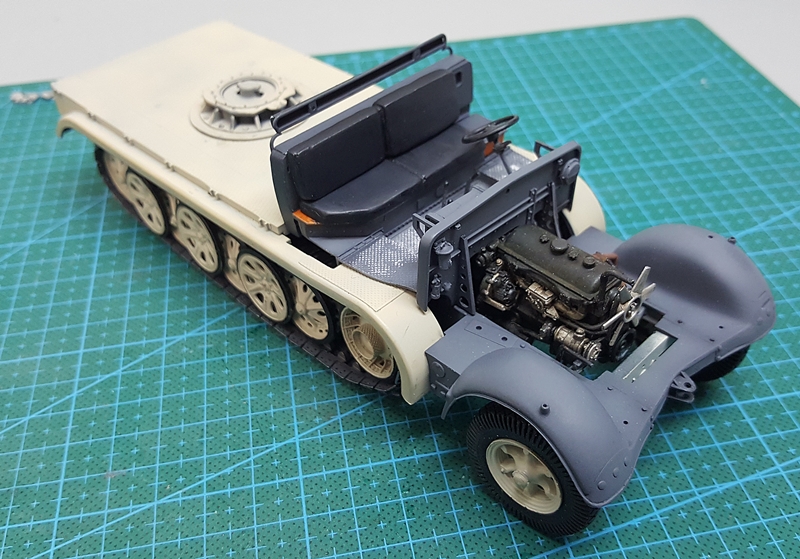
Tiger 211 did not have its head lamp in place in the pictures of the actual vehicle so I am leaving it off. I punched a disc out from plastic card with my punch and die set to replicate the lamp socket. The lamp conduit is from lead wire. As you can see it has a distinct loop that clears the top of the armour plate. A number of models I have seed have this conduit flush with the top of the armor plate which was not the case. Finally, I added the camo net loops on the sides and rear of the hull.

The C-Clamps on German Tigers had two Butterfly nuts to secure and remove the clamp. Fortunately,  I had some Bronco 1/35  German butterfly nuts so I used these on the top hull C-Clamp.  I am going to add them to the rear C-Clamp as well. Didn't want to add them at this early stage as they would have probably broken off with all my rough handling of the model up to this point.


Wednesday, October 26, 2016

1/35 Tiger I Late (AFV Club)

I completed the tracks, painted and mounted them to the hull. I also gave the lower hull a spray of Dunkel Gelb as part of this step.

I wanted to add some more detail to the rear hull so I added some Tiger Model armoured exhaust covers which I had in my parts inventory. I really like these resin add-ons as they have the pins sticking out the sides of the covers and have casting marks on the top of them. You won't see these marks when the exhaust shield is added but still nice. I also added an aber clasp to the rear jack arm which is not in the kit but is part of the actual vehicle.


Tuesday, October 18, 2016

1/35 AFV Club Tiger I Late


In the October 13th update below you can make out the zimmerit on the bow plate and glacis of the tank. For this zimmerit I used the Tamiya stick-on zimmerit. While it doesn't look terrible it doesn't really match the zimmerit I did myself  on the hull and rear using epoxy putty and my Lionroar Zimmerit tools. I think mine looks more accurate. So, I started re-doing this area by working on  the bow plate first. I let it harden for 24 hours then finished off the glacis and lower front hull.

I think it turned out quite well and I was able to get it pretty thin. My technique is to use a tooth pick, water and  ISO Propyl alcohol.

I included a pic of the rear plate to show the look of my zimmerit.


1/35 AFV Club Tiger I Late

One of the issues with this kit is the bolt locations on the turret deflector ring. They are wrong. So, I re-did this area by drilling the correct location of the holes in the ring and filling the incorrect ones. Here's a pic.

Thursday, October 13, 2016

1/35 AFV Club Tiger I Late

Track work using AFV Clubs late Tiger tracks. Very easy to use and the sag looks pretty good. I especially like the price of these tracks. They are like half the price of Fruils and other white metal offerings.


Sunday, October 2, 2016

Meng's New 1/48 P51 Mustang

Some recent CAD Shots of Meng's new P-51D Mustang. I must say they are damn nice and the detail looks excellent and accurate but we shall see with the actual styrene parts as they often tend to have softer detail than the actual CAD renderings.


Tuesday, September 20, 2016

Sd.Kfz 7/1 (early) with Flakvierling

Work on the seats.

Trumpeter screwed the pooch when it came to doing the front seats of this vehicle.

Here's what they look like. Ugly as shit.


And what they are suppose to look like.


My Fixes: Copious amounts of filler, plastic card and epoxy putty.


The front seats had a sheet of wood underneath them.. I added this to the area and scratched my own battery box which I believe is suppose to be part of the actual vehicle. You can see the edge of it in the Maquette walk around of the 7/1 photo above. The kit parts are 2 exposed batteries. Don't think they would leave these open to the elements. Can you imagine a crew accidentally stepping on them in the pouring rain?


And the seats attached and the cab attached to the vehicle. I still have to add the hinges on the driver left side and middle of the seat.


Monday, September 12, 2016

Trumpeter Sd.Kfz. 7/1 (early) with Flakvierling

Work continues on the Trumpeter kit.

I completed the firewall, exhausts and flak mount then primed and painted everything as well as putting a metal coat on the exhaust system. I then weathered it with Mig Pigments and AK interactive dark streaking grime and dark wash.


Friday, September 2, 2016

Miniart SU-85

I received this kit last week and man is this one is a beast. I had it on pre-order at Hobbylink Japan and got it for a respectable price. The reviews of this kit have been very positive thus far. I am really looking forward to building this one in the future.

As you can see Miniart has dispensed with the formality of packaging individual sprues.Just throw them all into one big bag. Not very refined I must say but hopefully the parts are not scratched to all rat shit.


Wednesday, August 31, 2016

Comments For All

I had inadvertently restricted comments on my blog to google users. Now if anyone wishes to comment they can just hit the comments word below my post and post their comments
.

Monday, August 29, 2016

1/32 Revell Spitfire MK IIa

I haven't really posted any pics of my work on the Revell Spitfire I have been working on for quite a while. I still haven't progressed past the cockpit but I am hoping to move forward on this build soon. I am presently working on the Cockpit harness and oxygen line. Here are some pics from the build which I am doing over on Large Scale Planes. The pit is just dry fitted in these pictures


Sd.Kfz. 7/1 (early) with Flakvierling 38

Tracks more less complete now. I used Humbrol enamel metalizers black and gun metal. I primed the tracks first with Tamiya Metal primer, sprayed the mixture on then when dry used a Q-Tip and paper towel to buff everything out. Finally I painted the rubber track blocks black. The tracks on the left side are on backward. Oh well. Everything is just dry fitted.


Sunday, August 14, 2016

Sd.Kfz. 7/1 (early) with Flak vierling 38

I recently purchased some of the MIG AMMO Dunkelgelb colours, ie. Mid War, DGI and DGIII. I like the colour of the DGIII as it closely resembles the color of the vehicle in the picture I posted previously. I sprayed the paint on but it took a long time to dry which I found unusual. The instruction on the bottle say let dry 24 hours but even after 24 hours it was still a bit tacky to the touch. This was my first time using these paints and I was not expecting that. The paint also dries with a satin finish not dead flat. This is not a problem ad weathering and filters will most likely take this away...I hope.